


If you’re interested in getting started with C# logging as quickly as humanly possible, you’ve come to the right place. Today, we’ll look at just how to do that.
This post is a tutorial that we’ll get you from zero to hero in regards to C# logging. By the end of the post, you’ll have learned, in practice, how to start logging in C#. But I bet you want to know a bit more about the fundamentals of logging, right?
Don’t worry, we’ll get into comprehensive detail too, covering a number of topics. They include:
- What is application logging?
- Why should you care about logging?
- What’s involved in logging?
- Logging To Different Media
- Introducing logging frameworks
But for now, let’s get to the action. How can you start logging in the absolute quickest and simplest way possible? Let’s take a look.
![]()
The Simplest C# Logging That Could Possibly Work
Let’s start with a clean slate for the sake of easy demonstration. For this tutorial, I’ll be using .NET 5.0, which you can download and install for free. It’s cross-platfom, supporting not only Windows, but macOs and Linux as well.
I’ll use Visual Studio Code—also free, also cross-platfom—as my editor. It will be slightly easier to follow along with the tutorial if you also use it, but feel free to go ahead with whatever you feel most comfortable with.
Start by opening your terminal/command prompt. Navigate to a location of your preference and run the following command:
dotnet new console -n LoggerPlaypen
The command above creates a new console application called “LoggerPlaypen.” Now, let’s open the application using Visual Studio Code. Run the following commands:
cd LoggerPlaypenopen code .
By running the commands above, you’ll access the folder of the newly created project and open its contents on Visual Studio Code. You should see something like this:

You might see a message like the one below:
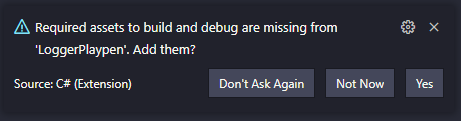
If such a message appears, make sure to click Yes. You’ll now be ready to start coding. Open your Program.cs file and edit the Main method, so it looks like this:
static void Main(string[] args)
{
    var displayMessage = "Hello, user!";

    Console.WriteLine(displayMessage);
}
We now have an application that successfully defines a greeting and displays it.
When you hit F5 to run, you’ll see the “Hello, user!” message being displayed. Alternatively, you can go back to the terminal and execute the dotnet run command:

But let’s say that we wanted not only to display this message but also to log it to a file. How might we do that?
With something fancy, like a logging framework, inversion of control, or aspect-oriented programming?
Nah, let’s not get ahead of ourselves. Try this instead, making sure to add “using System.IO;” at the top with the other using statements:
static void Main(string[] args)
{
    var displayMessage = "Hello, user!";

    File.WriteAllText("log.txt", displayMessage);

    Console.WriteLine(displayMessage);
}
Now, when you hit F5, you’ll see your greeting message once again. But that extra line you’ve added will create a log file for you.
Go to your project directory. You’ll see a file hanging out there in addition to your project files.

Is That Really It?
And…that’s it. You just successfully implemented your first C# logger!
Is that all you need to know about logging? Of course not.
Will this logging scheme be sufficient for any but the most trivial applications? Nope.
But have you learned the barest essential backbone of C# logging? Absolutely.
I told you it’d be a quick start. But I strongly recommend that you read on to really get a handle on this logging thing.
What Is Application Logging?
Let’s briefly talk about what application logging is, from a definition point of view. Here’s how I’ll define it.
Application logging involves recording information about your application’s runtime behavior to a more persistent medium.
So take the little logger we created, for example. The goal of the application was to display a message to the user, which it did.
But what if we wanted to store information about that message more permanently?

That’s where logging comes in. We write the message to a more permanent medium so that we can investigate later, after the program has finished.
Sure, it might not be overly interesting when we’re defining the greeting inline. But what if we took the greeting as a command line parameter or read it from a file somewhere?
Then having this permanent record seems more useful.
Application logging is the practice of determining what information is useful to capture and then recording it somewhere for future access.
Why Bother Logging? What’s the Motivation?
So far, I’ve talked in general terms about motivation. Maybe we want to see what happened later. But let’s get specific.
Software is really complicated. And to make matters worse, for most of its life, you don’t run it in debug mode on your desktop.
Instead, you build this enormously complicated thing, and then you turn it loose into the wild, hoping for the best.
Logging is your main means of managing this complexity and uncertainty. Logging helps in the following ways:
- You can read through the entries in the log to gain a sequential understanding of what your application did.
- When users report errors or issues, you can use the log to attempt to reconstruct what went wrong and then, ideally, to recreate and fix the issue.
- If you actively monitor logs (generally in cloud/web environments more than desktop apps like our little toy), you can detect problems as they’re happening or even before they happen.
- If your application handles important or sensitive information, you can use (hopefully secured) logs to track how that information flowed through your system.
In short, you log so that you can retroactively debug and analyze your application as if you were running it in the moment.
What’s Involved With Logging?
All of that sounds pretty impressive, and you might be wondering how we get all of that from a file containing the text “Hello, user!”
It’s admittedly a bit of a long road. (And I’ll talk more about the vast difference between what we did above and proper application logging shortly.)
The answer is that a lot more goes into a proper logging strategy than just randomly dumping text. I’ve talked at length on this subject in the past, but let’s quickly review some of the components that go into creating entries in your log.
Conceptually, you can think of each entry in a log as an event. This makes sense because you’re communicating information at a snapshot moment in time.

So the value of the log stems directly from what you capture about the events you put into the log.
Here are some things that you’ll usually want to capture for each event:
- A unique identifier for the event.
- A timestamp. Exactly when did this event take place?
- Context that makes it clear to a reader what’s going on. For instance, just recording “Hello, user!” might prove confusing weeks or months later. A better message, including context, might say, “Recorded user greeting of ‘Hello, user!'”
- Tags and categories for each entry for later search and classification.
- Log levels, such as “error,” “warning,” or “information,” that allow further filtering and provide additional context.
As you can see, our log file above leaves a bit to be desired.
You Can Log to Different Media
You may have noticed that, in spite of using a file in our initial example, I haven’t talked specifically about files very much.
There’s a reason for that. You might want to log somewhere other than a file.
In most contexts that you’ll hear about logging, you’ll hear about log files most commonly. But that doesn’t mean you have to use a file.
Here are some other common destinations for log information that you should be aware of.
- Tables in relational databases.
- A document database.
- Something like a console (live logging).
- The windows event viewer.
- A third-party aggregator or web service.
There are more than that besides. Honestly, the possibilities are limited only by your imagination and ability to implement it.
And for each one of those destinations, there are a number of variants on the format and other particulars.
Our Little Log, Revisited
Now that you understand more about logging, let’s think back to our toy example, designed to get you going quickly. More specifically, let’s look back on how inadequate it turns out to be.
If you’ve given it some thought, here are questions you might be asking at this point:
- That code overwrites the log each time—don’t we want it to append to the file or something?
- What if we run two instances of that program at once? Won’t that get weird with log file permissions?
- If we want all of that context—ID and timestamp stuff—do we seriously have to write all kinds of boilerplate code?
- Must we write to files or whatever in every method in our codebase?
- And speaking of files, what about the other mediums above? How would we do databases or web services?
There are a lot of questions for which you’d need answers in order to have a good logging approach. But don’t get discouraged.
Introducing Logging Frameworks
Luckily, you won’t need to spend the next four months answering the questions above.
It turns out that smart people have already answered them for you and made code available so that you don’t need to worry. And best of all, this code is often free.
Enter the concept of the logging framework.

A logging framework is a package that you install in your codebase, usually via package management. Out of the box, it gives you flexible, configurable logging and a ready-made API.
You can make one-liner calls as simple as the one I made to the file API at the beginning of the post.
But with this call and with some initial configuration, you have nicely formatted, consistent log entries and answers to all of the questions you were just asking.
Let’s Install a Logging Framework
Let’s return now to our little toy codebase. And let’s also delete that call to File.WriteAllText() that we added since it’s time to log like pros.
Recall that I just mentioned using a package manager. The first thing we’re going to do here is use the .NET CLI to install a package.
And the package we’re going to install is a logging framework called Log4Net. This is not the only option you have for such a framework, but it’s a popular one, and this is a quick start guide. You can always play with others later.
Back to your terminal, make sure you’re inside the project’s folder. Then, run the following command:
dotnet add package log4net --version 2.0.12
The command above installs the latest version of Log4net, which at the time of this writing is 2.0.12.
Configuring Your Logger
Alright. Now, if you look around for tutorials about log4net, you might find yourself confused.
Log4net setup is handy, but it’s not completely turnkey. And most tutorials confuse you with options and settings and such.
I’m going to break this down instead to dead simple, rote instruction. This isn’t the only way to do it, but it’s the way with the fewest confusing steps between you and the log file you’re chomping at the bit to have.
There are two components to what you need to do:
- You have to add a configuration file that tell Log4Net how to behave in general.
- You have to add three lines of code:
- Declare an instance of the logger object.
- Execute a command that tells Log4Net to set itself up according to your settings in the config file.
- Actually log something.
So let’s do that. First, go to Visual Studio Code and create a new file. Call it log4net.config. Then, paste the following text on it:
<log4net>
 <root>
  <level value="ALL" />
  <appender-ref ref="LogFileAppender" />
 </root>
<appender name="LogFileAppender"
type="log4net.Appender.RollingFileAppender">
<file value="proper.log" />
<lockingModel type="log4net.Appender.FileAppender+MinimalLock" />
<appendToFile value="true" />
<rollingStyle value="Size" />
<maxSizeRollBackups value="2" />
<maximumFileSize value="1MB" />
<staticLogFileName value="true" />
<layout type="log4net.Layout.PatternLayout">
<conversionPattern value="%d [%t] %-5p %c %m%n" />
</layout>
</appender>
</log4net>
Now For the Code
Okay. With the configuration squared away, you’re ready to add some code. Start by adding the following lines to your list of usings:
using System.Reflection;
using log4net;
using log4net.Config;
Now, as a class level field, add the following line:
private static readonly ILog _log = LogManager.GetLogger(MethodBase.GetCurrentMethod().DeclaringType);
Next, at the very top of your Main() method, add the following two lines:
var logRepository = LogManager.GetRepository(Assembly.GetEntryAssembly());
XmlConfigurator.Configure(logRepository, new FileInfo("log4net.config"));
The lines above will be responsible for loading the configuration you declared using the config file.
And finally, add the following line of code to where you earlier had the call to File.WriteAllLines().
_log.Info(displayMessage);
The final class should look like this.

That’s it—all done. Now, you just have to run it.
Taking a Look at the Results
Run it as before, and you’ll observe the same behavior as before. But if you navigate to the Bin->Debug folder, check out a new file there, called “proper.log.”
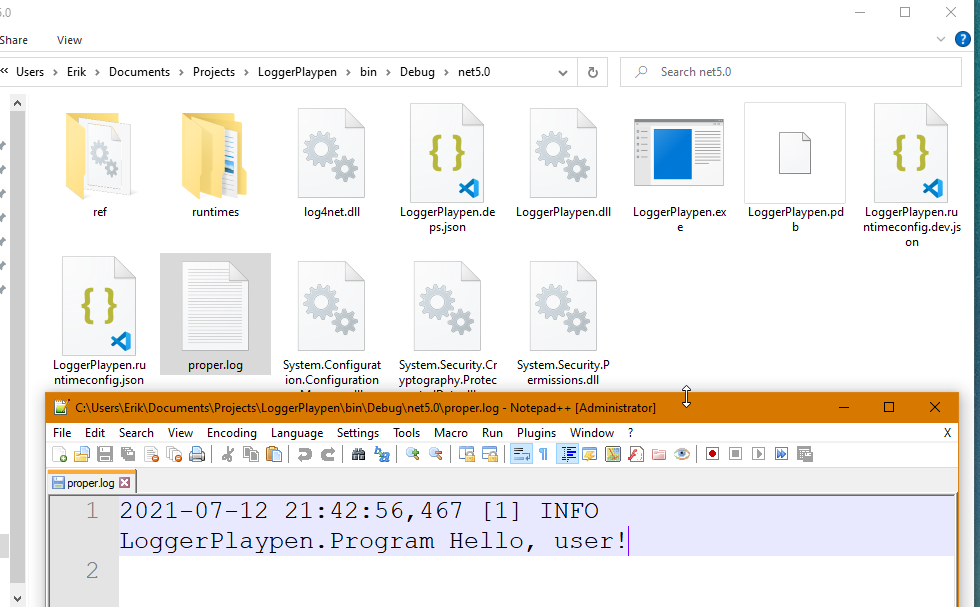
Remember how earlier I talked about the sorts of things that you want to capture in a log? Well, look what we’ve got here with our single log event now:
- A timestamp.
- The thread this message came from.
- The logging level.
- The class of origin.
- The message.
Is that everything you might want? No.
But is it a darned good start, considering that you added a package, pasted some XML, and added three lines of code? I’d certainly say so.
And that is the power of a logging framework.
And speaking of that blob of XML that you pasted just to get things going, there’s a lot of power there as well.
The “layout” entry lets you configure a TON of information about each log entry that you capture, for instance.
In there, you can also control some other settings as well, such as the name of the log file, how big you let it get, and some other stuff about rolling backups.

That “other stuff” starts to become clearer when you understand what an appender is. Note that you configured an appender in XML.
The appender is the pluggable thing that lets you choose whether you want to send it to a file, a database, the console, etc. In the link I included, you can see that there are a lot of appenders at your fingertips.
This means that you can leave your application logging code alone and just update this XML file with a different appender to direct your logs somewhere else entirely.
Pretty neat, huh?
C# Logging: What Now?
We’ve really just scratched the surface of C# logging here, but that was the goal of this guide. I wanted to get you up to speed as quickly as humanly possible.
The work you now have in front of you is a bunch of learning, but at least you can do that learning with a real live working log file.
You should probably start by playing with your current setup, which is by no means the best.
It’s also worth noting that you have options not just for appenders but also for logging frameworks, if you want.

Log4net is battle-tested and will get the job done for you, but you might want to try other options at some point as well.
And if you stick with log4net, you might want to check out an in-depth tutorial, like this one at Pluralsight, for instance.
And you can always stay tuned to the blog here at Scalyr for additional posts about logging and logging practices, such as these ones:
- Application Logging Practices You Should Adopt
- Logging Best Practices: The 13 You Should Know
- Log Formatting: 7 Best Practices for Readable Log Files
- Be Kind to Your Log File (And Those Reading It)
Scalyr makes a log aggregation tool, meaning that once you get good enough to have lots and lots of data in lots and lots of log files, they’ll help you put them all in one place, search them, and visualize the data in them.
If this sounds like what you need to get the job done, you can sign up here and try out the Scalyr demo.
So this blog is always a good source for general logging information.
But your main task now is to tinker, experiment, configure, and grow your application logging until it suits your needs and you’re getting all of the data you want out of it.
